SwiftUI has always been about making UI development more intuitive and less cumbersome, and iOS 17 takes this a step further. One of the standout features of iOS 17 is the Transferable protocol, which significantly simplifies the process of selecting and displaying media in your SwiftUI apps. I wanted to take some time to dive into how we can use the Transferable protocol to easily load Videos in our project.
Getting started with State
Let’s kick things off with the essentials: loading and showing videos. It’s like the bread and butter of media apps, and SwiftUI makes it pretty straightforward, yet there’s some neat stuff under the hood.
Picture this: a view that adapts based on what’s happening with our video. That’s what ContentStateView does. Here’s the gist:
struct ContentStateView: View {
    @EnvironmentObject var viewModel: ContentViewModel

    var body: some View {
        switch viewModel.videoState {
        case .empty:
            // When no video is chosen, we nudge users to upload one.
        case .loading:
            // Good old progress indicator when the video is loading.
        case .success(_):
            // Here's the real deal - playing the selected video.
        case .failure:
            // Oops! Shows up if something goes awry.
        }
    }
}
In this view, we’re handling four distinct states:
- Empty: When no video is selected, a friendly prompt encourages users to upload a video.
- Loading: A progress view for times when the app is busy loading the video.
- Success: The most important part of our feature is the
VideoPlayercomponent that plays the selected video. - Failure: A simple error state indication.
ContentViewModel
Our ContentViewModel is the puppet master here. It tracks the video selection and manages the AVPlayer. It’s all about keeping things in sync and smooth.
class ContentViewModel: ObservableObject {
    enum VideoState {
        case empty, loading(Progress), success(URL), failure(Error)
    }

    @Published var player = AVPlayer()
    @Published var isPlaying = false
    @Published private(set) var videoState: VideoState = .empty
    @Published var videoSelection: PhotosPickerItem? {
        didSet {
            if let videoSelection {
                let progress = loadTransferable(from: videoSelection)
                videoState = .loading(progress)
            } else {
                videoState = .empty
            }
        }
    }

    private func loadTransferable(from videoSelection: PhotosPickerItem) -> Progress {
        return videoSelection.loadTransferable(type: Movie.self) { result in
            Task {
                await MainActor.run {
                    guard videoSelection == self.videoSelection else { return }
                    switch result {
                    case .success(let movie):
                        if let url = movie?.url {
                            self.player = AVPlayer(url: url)
                            self.isPlaying = false
                            self.videoState = .success(url)
                        } else {
                            self.videoState = .empty
                        }
                    case .failure(let error):
                        self.videoState = .failure(error)
                    }
                }
            }
        }
    }
}
Within the ContentViewModel, we can track many properties that pertain to our video - this includes the AVPlayer itself, a Boolean to determine if it’s playing, the VideoState of the selected media, and the PhotoPickerItem itself.
With these @Published we should be able to watch for all the changes that we need in our app.
In your case, you might be running into an issue already. PhotoPickerItem does not have a Transferable type for Movie.self - you’re right! We need to create this ourselves.
First up, let’s quickly make our Movie struct. Since we only care about the URL in the scope of this blog post, we won’t need to add anything else; however, what you need might be more, so adapt your code to your requirements.
struct Movie: Codable {
    let url: URL
}
And now that we have the Movie struct, we can create an Extension on it to conform to the Transferable protocol:
extension Movie: Transferable {
    static var transferRepresentation: some TransferRepresentation {
        FileRepresentation(contentType: .quickTimeMovie) { video in
            SentTransferredFile(video.url)
        } importing: { received in
            do {
                let url = try saveFileToTemporaryPath(receivedFile: received)
                return Self(url: url)
            } catch {
                fatalError("Failed to save video file: \(error)")
            }
        }
        // Handle similar cases for .video and .movie below
    }

    static func saveFileToTemporaryPath(receivedFile: ReceivedTransferredFile) throws -> URL {
        let fileName = receivedFile.file.lastPathComponent
        let copyURL = FileManager.default.temporaryDirectory.appendingPathComponent(fileName)

        if FileManager.default.fileExists(atPath: copyURL.path) {
            try FileManager.default.removeItem(at: copyURL)
        }

        try FileManager.default.copyItem(at: receivedFile.file, to: copyURL)

        return copyURL
    }
}
We create the static function on the Movie struct so that we can correctly convert, and set the Transferable to where we need it. We save a local copy to the temporaryDirectory and then we return the URL so that we can use it a little later with the VideoPlayer.
Once we have created the required static TransferRepresentation we are finally able to move on to the fun part - or at least my favorite part: designing our UI. To keep things simple, we will have one View (our ContentStateView from earlier) and a Button that will trigger the PhotosPicker view so we can select our images. Let’s place them inside of a new View called ContentContainerView which will just be a VStack with our content inside.
struct ContentContainerView: View {
    @EnvironmentObject var viewModel: ContentViewModel

    var body: some View {
        VStack {
            ContentStateView()
                .background(Color(.secondarySystemBackground))
                .clipShape(RoundedRectangle(cornerRadius: 25))
                .padding()
        }
        .background(Color(.systemBackground).ignoresSafeArea())
        .frame(maxWidth: .infinity, maxHeight: .infinity)
        .shadow(color: .black.opacity(0.2), radius: 15, x: 0, y: 3)
        .safeAreaInset(edge: .bottom) {
            PhotosPicker(selection: $viewModel.imageSelection,
                         matching: .videos,
                         photoLibrary: .shared()) {
                Text("Select a video")
                    .font(.headline)
                    .fontWeight(.semibold)
                    .foregroundStyle(.white)
                    .frame(maxWidth: .infinity, maxHeight: 60)
                    .background(Color.blue)
                    .clipShape(RoundedRectangle(cornerRadius: 18.0, style: .continuous))
                    .padding()
            }
        }
    }
}
For the sake of not bloating this article, we are throwing all of our modifiers onto the views themselves here, but to make the future version of ourselves appreciate us a little more, we should definitely consider converting all of these properties into Modifiers that we can use with a single line. You can read up on Modifiers and how to implement them in my blog post here.
Finally, once you are done creating your view, toss it inside the root view and make sure to initialize the ViewModel to pass into the environment, like so:
struct ContentView: View {
    @StateObject var viewModel = ContentViewModel()

    var body: some View {
        ContentContainerView()
            .environmentObject(viewModel)
    }
}
Note: We use a StateObject here because it will be the single source of truth. Any modifications will be made to this model, and it will be served around.
Now if all has gone according to plan, we should be seeing our View coming into sight now!
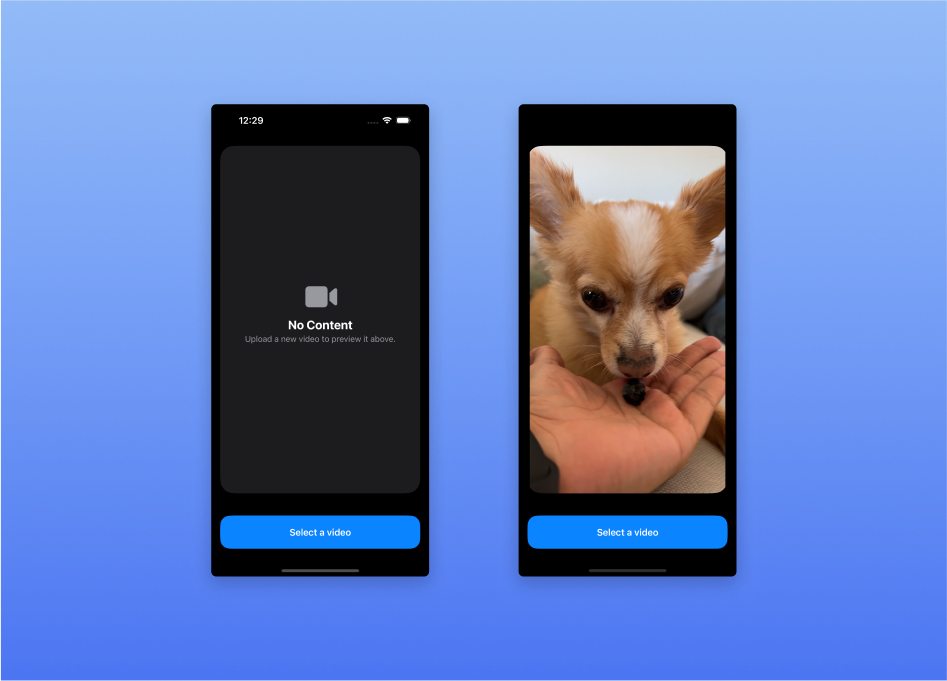
After going through and finding the right video, you have a perfect video loaded to play, pause, rewind, and forward!
Taking it a step further
But wait - did you see that? If you’re using dark mode, there is a chance you didn’t, so let me show you exactly what I mean:
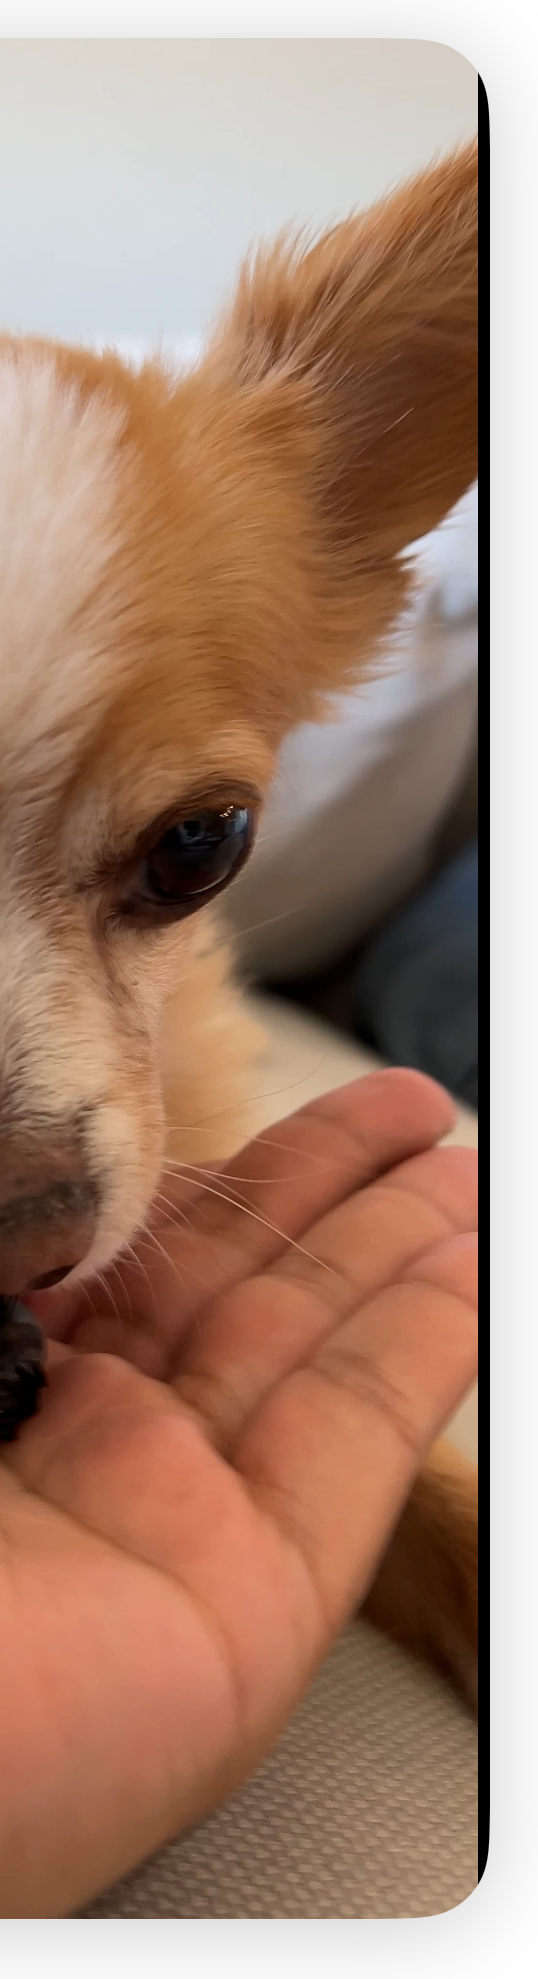
That little sliver of black on the side of the video shouldn’t be there. And it gets worse if the video is in any other wider or narrower aspect ratio. The reason for this wasn’t easy to figure out, but I tracked it down.
AVPlayer is the core of the video player object in our code; however, within UIKit there is more to unravel in the world of AVKit - one of those being the AVPlayerLayer. This layer is what represents the visual contents of a player object. This layer has a few properties that can help us in configuring its presentation, one of these being videoGravity.
The name doesn’t lend a hand at relieving your confusion - the videoGravity property “specifies how the layer displays the player’s visual content within the layer’s bounds.” In simple terms, this will allow us to increase the aspect ratio of a video to fill the entire view!
The catch here is that we are leaving SwiftUI land and heading into UIKit to get a little lower into our views. To start, we will need a UIViewRepresentable for our VideoPlayer:
struct VideoPlayer: UIViewRepresentable {
    @ObservedObject var viewModel: ContentViewModel

    func makeUIView(context: Context) -> PlayerView {
        let view = PlayerView()
        view.player = viewModel.player
        return view
    }

    func updateUIView(_ uiView: PlayerView, context: Context) { }

    func makeCoordinator() -> Coordinator {
        return Coordinator(self)
    }

    class Coordinator: NSObject, AVPictureInPictureControllerDelegate {
        private let parent: VideoPlayer

        init(_ parent: VideoPlayer) {
            self.parent = parent
            super.init()
        }
    }
}
This custom View will be the way we present our video in our app. As you probably know, a UIViewRepresentable will return a UIView, and in our case, we are making a custom UIView to support the features we need with AVPlayer.
final class PlayerView: UIView {

    override static var layerClass: AnyClass {
        return AVPlayerLayer.self
    }

    var player: AVPlayer? {
        get {
            playerLayer.player
        }
        set {
            playerLayer.videoGravity = .resizeAspectFill
            playerLayer.player = newValue
        }
    }

    var playerLayer: AVPlayerLayer { layer as! AVPlayerLayer }
}
If you noticed, we are setting the playerLayer.videoGravity to .resizeAspectFill which will expand our video to fit the full size of our View. Finally, so that we can use this view, we will create another View to serve as the “container” for the AVPlayer. In our case we are going to call it CustomPlayerView:
struct CustomPlayerView: View {
    @ObservedObject var viewModel: ContentViewModel

    var body: some View {
        VStack {
            VideoPlayer(viewModel: viewModel)
                .overlay(LayerControlView(viewModel: viewModel), alignment: .bottomTrailing)
        }
        .onChange(of: viewModel.isPlaying, { oldValue, newValue in
            // Handle the playing state of the viewModel's player here if you
            // don't want to handle to use Combine.
        })
    }
}
Now how you handle the input for play and pause is up to you, but I created a simple View that I can overlay on the video to play and pause the video. Also, how you observe changes in your model is up to you, this is only one way of getting the data to flow in the right direction.
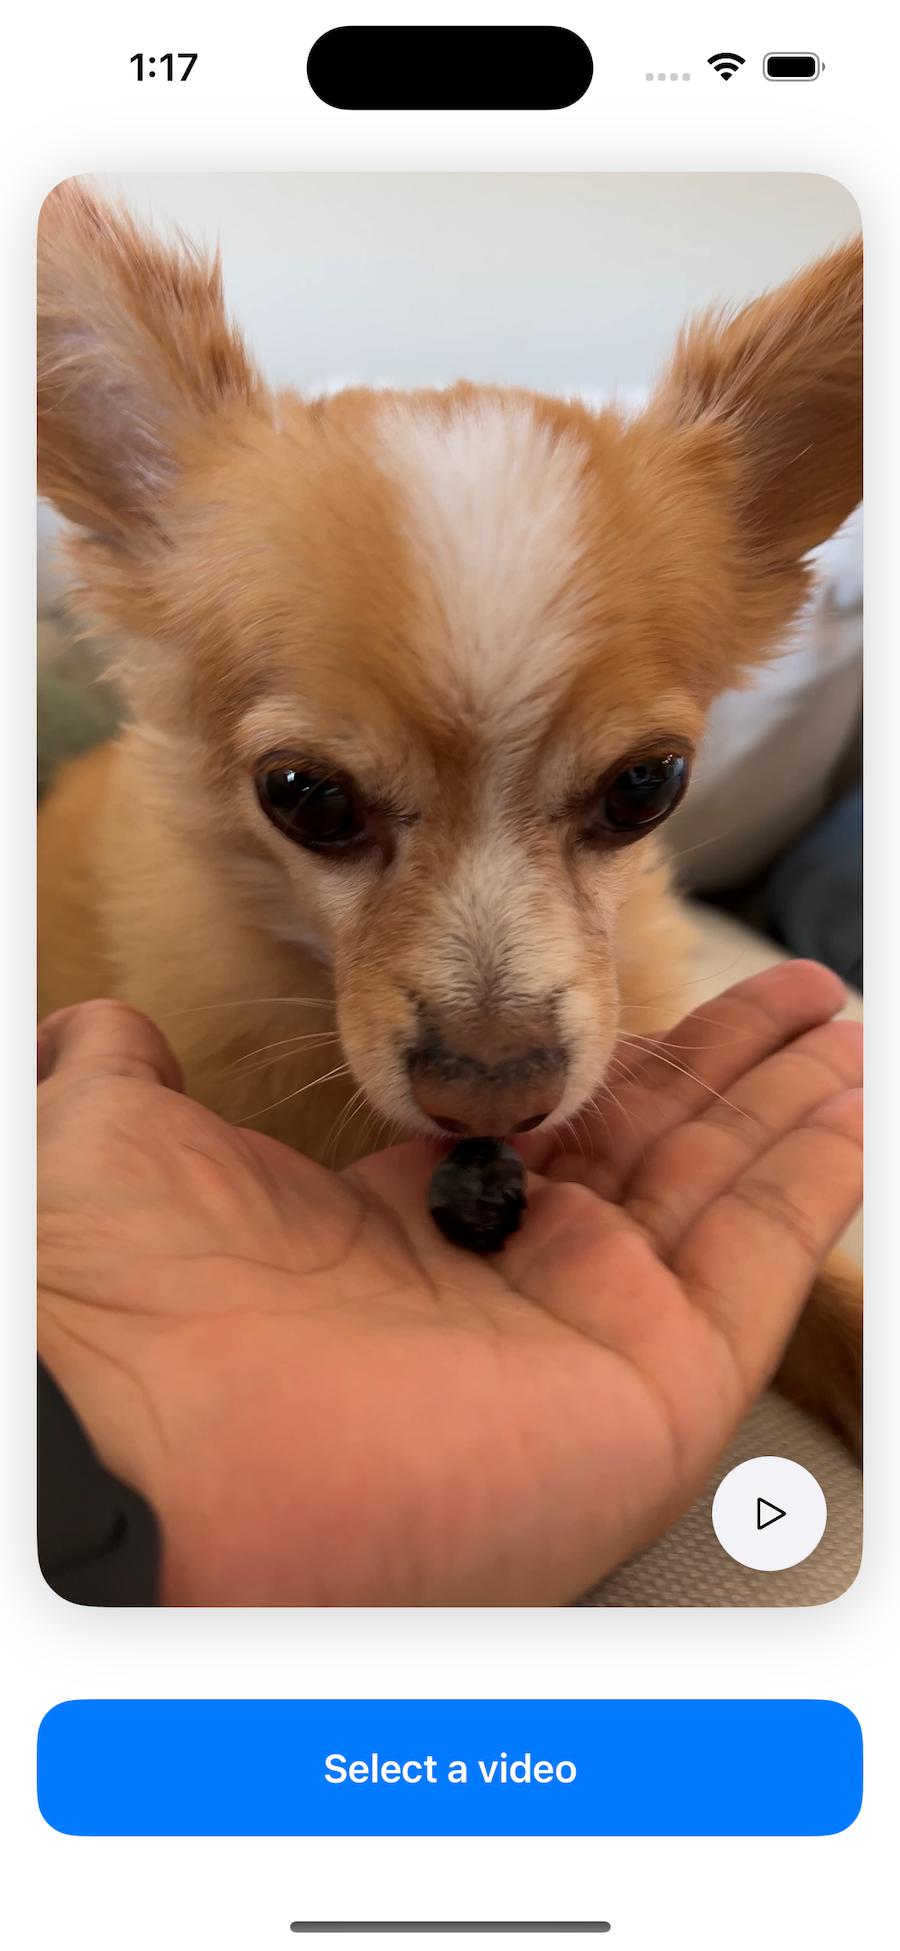
Once you have everything hooked up how it should be, you just replace the success case from your ContentStateView and you should now have the new and improved (although, the original functions much better) Video player!
struct ContentStateView: View {
    @EnvironmentObject var viewModel: ContentViewModel

    var body: some View {
        switch viewModel.videoState {
        ...
        case .success(_):
            // VideoPlayer(player: viewModel.player) <-- We are no longer using this one
            CustomPlayerView(viewModel: viewModel)
        ...
        }
    }
}
It’s always nice when we find a solution that doesn’t require having to install a third-party package.
Conclusion
There you have it! From basic video loading to a custom playback experience, SwiftUI and iOS 17’s Transferable protocol have got you covered. Dive in, try it out, and make your app’s video experience something to talk about. And remember, if you hit a snag or want to geek out about SwiftUI, hit me up on Twitter. Happy coding!